
Amending existing Absence types
Users can amend existing ‘Absence Types’ using the following steps:
Step 1– Select the Configuration tab.
Step 2– Update the details by using the drop-down menus or by deleting old data and typing in new data. Use the scroll bar on the right hand side to navigate down to he 'OK' and 'Cancel' buttons.
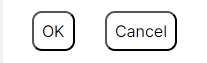
Step 3– Select ‘OK’ to save the updates you have made for this absence type.
HANDY HINT: Any updates you make to existing ‘Absence Types’ will not apply to existing absence bookings already made using this type. The updates will only apply to new bookings made using this ‘Absence Type’ following the amendments.
Absence Type Guidance
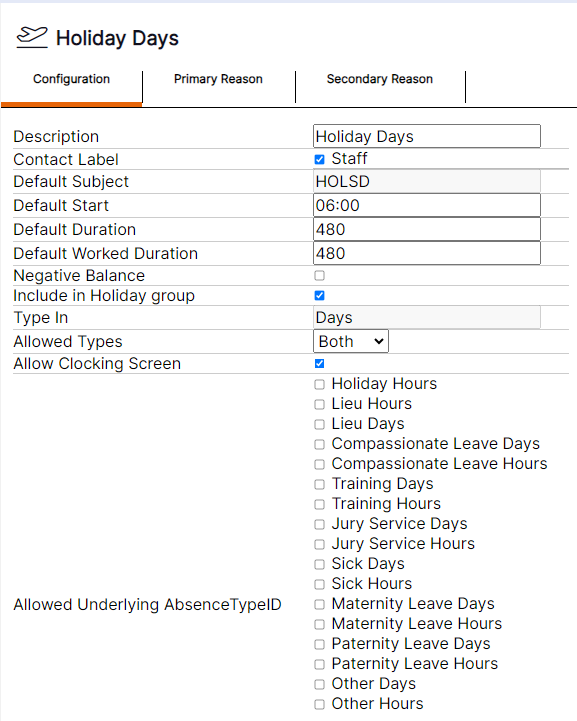
Description – The name of the ‘Absence Type’ as it will appear to users in the admin operational area.
Contact Label – A tick box list of the contact types available in the system i.e., staff will be the only option available in the standard product.
Default Subject - The Absence Name that will appear throughout the system. For example, the name of the ‘Absence Type’ when it has been booked on a staff member in the rota.
Default Start - The default start time of the absence if no underlying shift is present. I.e., if the staff member is not rostered to work and an absence is booked this would be the time that absence would begin. Users should always enter 06:00 here.
Default Duration - The default shift duration if no underlying shift is present. I.e., if the staff member is not rostered to work and absence is booked this would be the duration the system will assign to an underlying shift in order to allow the booking. Users should always enter 480 here.
Default Worked Duration - The default worked duration of the shift if no underlying shift is present. I.e., if the staff member is not rostered to work and absence is booked this would be the worked duration the system will assign to an underlying shift in order to allow the booking. Users should always enter 480 here.
Negative balance – select this tick box if you would like this ‘Absence Type’ to count up the number of instances booked on a staff member within a leave period, instead of having an allowance to count down from. This also controls the tabs available on the ‘Absence Adjustments’ ‘Smart Tile’. I.e., you will only get the taken tab to report on bookings made for this ‘Absence Type’ if negative balance is selected, if it is not selected you would get the taken and accrued tabs. If you decide to change an absence type’s settings for negative balance when it has already been used for some bookings, the calculations made by the software will only adjust correctly for the current and any future leave periods. If you have already made bookings in a past period, it is best practice to create a new ‘Absence Type’ to use with different settings.
Include in ‘Holiday Group’ – select this tick box if you would like the ‘Absence Type’ to be available on the ‘Holiday Group’ includes tab, in order that it can be counted towards leave booking slots if required.
Type In – Select either hours or days to confirm if this absence is booked in hours or days.
Allowed Types – Select either Both, Full or Part to confirm if the ‘Absence Type’ can be booked for full days or part days only or choose both if users should have the option for full or part absence on this absence type. This controls the options available on the absence booking screens from the rota or clocking screen. If you select full only, users will not have access to the option to book part leave for this absence type.
Allow Clocking Screen – Select the tick box if you would like staff members who have this absence booked on them to appear on the clocking screen. For example, a training ‘Absence Type’ may be used therefore staff are absence from their usual job but are still required to clock in as this is a training day.
Allowed Underlying ‘Absence Type’ ID – allows the user to identify if this ‘Absence Type’ can book on top of other ‘Absence Types’. The user should select the ‘Absence Types’ they would like to be able to book this ‘Absence Type’ over.
Allow Hours override – Select the tick box to allow the user to enter an absence duration in hours to be used as the value to subtract from the allowance or add to the running total balance, when they are requesting a booking on self-service or making a booking via the rota, and this will override automated absence calculation durations – i.e. for ‘Absence Types’ in a value of hours the system looks to the hours per day field on the contract the staff member is assigned to, in order to calculate the amount to subtract from the allowance or add to the running total balance.
Payroll Code – Enter the code that you would like the ‘Absence Type’ to display as in the payroll export. This applies if you have purchased T&A rules and have a payroll export to send to a payroll provider to pay your staff.
Short Code - Allows the user to set the word that will display on the front of the absence when booked on the rota or the staff member’s my rota.
Carry Forward – Select the tick box if you would like staff member’s to be able to request to carry forward some of their balance for this ‘Absence Type’ via a self-service request which will be sent for approval. This also controls the Carry Forward tab being available on the ‘Absence Adjustments’ ‘Smart Tile’ for this ‘Absence Type’.
Carry Forward Validation SP - use the default standard procedure.
Carry Forward Requested SP - use the default standard procedure.
Carry Forward Approve SP - use the default standard procedure.
Email when booked on rota – selecting this tick box will send out emails in connection with the option chosen on the ‘Email notifications for absence requests’, and in accordance with the contact preference selected on the staff member’s account.
Email when booked on clocking screen – – selecting this tick box will send out emails in connection with the option chosen on the ‘Email notifications for absence requests’ , and in accordance with the contact preference selected on the staff member’s account.
Email when booked as open ended - – selecting this tick box will send out emails in connection with the option chosen on the ‘Email notifications for absence requests’ , and in accordance with the contact preference selected on the staff member’s account.
Payroll Type – Select if this ‘Absence Type’ should be paid or unpaid as default. I.e., the value that in the final section of the absence booking screen, the drop-down menu should default to.
Pay Type Select ‘User types’ - The ‘User types’ that are allowed to override the payroll type when booking this absence. I.e., if a user with this user type books this absence, it will allow them to amend the paid or unpaid option when booking on the rota.
Pay Type Modify ‘User types’ – Select the ‘User types’ that are allowed to override the pay type when approving a request for this absence. I.e., if a user with this user type approves this absence via a request on self-service, it will allow them to amend the paid or unpaid option when approving the request.
Booking ‘User types’ - Select the ‘User types’ that are allowed to book this absence using the red absence icon, i.e., on the rota or clocking screen. I.e., any user type to selected here will not have access to book this ‘Absence Type’ in the system. I.e., will not appear in the drop-down menu on the absence booking pop up on the rota.
Cancel ‘User types’ - The ‘User types’ that are allowed to view details of existing absence bookings using the red absence management icon, i.e., on the rota. I.e., if a user type is not selected here, the red absence management icon would not appear on absence bookings on the rota if a user were logged in with that user type.
Book in separate days – Select the tick box if this ‘Absence Type’ should always book in separate days. I.e., if 5 days were booked for this ‘Absence Type’ and the tick box was not selected the 5 days would be treated as one booking. If the tick box were selected the booking would be treated as 5 separate day bookings. This happens at the time of approval, for example if you have the box ticked, and a request was made for 5 days on self-service, the manager will still receive this as one request, however once approved, the system will treat this as 5 separate absence bookings in all areas. This is useful if you will need to regularly cancel part of absence bookings already approved, meaning you do not have to cancel the entire absence and re-book it, as you will be able to cancel individual days of that absence.
Display on homepage – Select the tick box if you would like this ‘Absence Type’ to appear on the ‘My details’ ‘Smart Tile’ for each employee on self-service, so they can see either how many days they have booked for this ‘Absence Type’, or how much balance they have remaining for this absence type. The way this will display depends on the option you have chosen in the negative balance tick box.
Available Process – use the default standard procedure.
Balance Process –use the default standard procedure.
Requested Process –use the default standard procedure.
Validate Process –use the default standard procedure.
Approve Process –use the default standard procedure.
Cancel SP –use the default standard procedure.
Quick default –select this tick box if this ‘Absence Type’ should be made available to staff to request absence on self-service.
Rota Class - This is the colour the absence will display on the rota when viewing the rota by via the setting colour by shift.
‘Open’ Ended – Select the tick box if this ‘Absence Type’ can be booked as an open-ended absence I.e., the user will have the option to book it as an open-ended absence when making the booking.
Pre-book period – Enter the number of days the absence should book ahead of time on the rota if the absence has been selected as an open-ended absence. I.e., if this ‘Absence Type’ is booked and it is open ended, this would be the number of days ahead of the start date that the staff member would show on absence on the rota.